
What are the typical steps involved in planning and installing a mezzanine floor?
Planning and installing a mezzanine floor typically involves a site survey, requirements review, structural design, approvals, manufacture, preparation, installation and final safety checks. A competent specialist should coordinate each stage so the finished floor is suitable for its intended loads, access arrangements and workplace use.
Planning and installing a mezzanine floor normally involves defining the intended use, surveying the building, developing a structural design, obtaining the necessary approvals, manufacturing the components, preparing the site, completing the installation and carrying out final safety checks. A competent specialist should coordinate these stages so the finished floor is suitable for its loads, access arrangements, fire strategy and day-to-day workplace use.
1. Establish the project brief
The process begins with a clear understanding of what the floor needs to achieve. This should cover the proposed use, the area required, expected imposed loads, storage or equipment requirements, access points, working practices and any future changes that may affect the design. The brief should also identify constraints such as operating hours, available headroom, vehicle movements, lighting, ventilation, utilities and the need to keep parts of the premises operational during the work.
It is important to distinguish between general floor loading and concentrated loads from items such as machinery, shelving, partitions or plant. These requirements affect the structural arrangement, floor finish, supporting columns and access design.
2. Complete a detailed site survey
A site survey confirms whether the proposed installation can be accommodated safely and practically. The survey should assess:
- Building dimensions, clear heights and available floor area
- Existing columns, walls, doors, services and obstructions
- The condition and capacity of the existing ground or supporting slab
- Fire exits, escape routes and access for people and equipment
- Levels, tolerances and any restrictions affecting installation
- Loading, unloading and temporary storage arrangements
Survey information should be checked against available building drawings rather than relying on drawings alone. Site conditions can differ from the original plans, particularly where services, alterations or repairs have been carried out.
3. Develop the layout and structural design
The specialist designer then develops a layout that balances usable space, structural performance and safe movement. This normally includes the position of columns, beams, stairs, gates, guarding, access openings, loading areas and any partitions or enclosures.
The design must account for the intended imposed loads, the weight of the floor construction, horizontal forces, connection details and the capacity of the existing slab or foundations. It should also consider vibration, impact risk and any localised loads. Structural calculations and drawings should be prepared by a suitably qualified and experienced designer, with the design checked where required.
Access and safety features should be considered at this stage, not added as an afterthought. For example, stair positions, handrails, edge protection, pallet gates, vehicle barriers, lighting and emergency escape arrangements can all influence the layout and cost.
4. Confirm planning, building control and fire requirements
Before manufacture or installation, confirm which approvals apply to the project. Depending on the building, location and proposed use, this may involve planning permission, building regulations approval, consultation with building control and review by the responsible person for fire safety.
The design may need to address structural stability, stair geometry, guarding, accessibility, fire resistance, escape routes, compartmentation, travel distances, lighting and ventilation. A change in the use of the space can also affect the building’s fire risk assessment and emergency procedures. Approval requirements should be confirmed with the relevant local authority or an appropriately qualified building control professional before work begins.
5. Finalise specifications and manufacture
Once the design and approvals are agreed, the specification is finalised. This should identify the structural members, floor panels or decking, finishes, stairs, guarding, gates, barriers, fire protection and any associated services.
Components can then be manufactured to the approved drawings. Controlled manufacture helps ensure that dimensions, connection details and protective finishes match the design. Any design changes made after approval should be reviewed formally, as changes to loading, layout or access can affect structural and regulatory compliance.
6. Prepare the site and installation plan
Good site preparation reduces delays and helps protect people working nearby. The installation plan should cover delivery access, unloading, component storage, lifting equipment, work zones, exclusion areas, temporary works and the sequence of assembly. It should also explain how the installation team will control risks from lifting, working at height, falling objects, interaction with workplace traffic and nearby operations.
Before installation, the base area should be checked for obstructions, slab condition and level. Services that could be affected must be identified and protected. The client and installation team should agree responsibilities for isolations, access, housekeeping, fire arrangements and keeping unauthorised people out of the work area.
7. Install the structural frame and floor
Installation is generally completed in a planned sequence, starting with the supporting structure and followed by beams, joists, floor panels, stairs, guarding and other components. The sequence will vary according to the design and site conditions.
Installers should work to the approved drawings and method statement, checking alignment, connections, fixings and levels as the work progresses. Temporary stability measures may be required until the permanent structure is complete. Open edges and access openings must be protected throughout the installation, including during periods when the floor is only partly assembled.
Any discrepancy between the drawings and actual site conditions should be reported and resolved by the appropriate designer or project lead. Unauthorised alterations, drilling, cutting or changes to support positions can compromise the design and should not be made on site.
8. Fit access, guarding and associated features
After the principal structure is installed, the remaining safety and operational features are fitted. These may include stairs, handrails, edge protection, pallet gates, loading gates, barriers, kickboards, doors, partitions, lighting and fire protection systems.
Each feature should be checked for its intended use. For example, access gates must prevent people falling through openings, stairs must provide a safe route, and barriers must be appropriate for the vehicles or loads operating nearby. The finished arrangement should not obstruct escape routes, fire equipment, ventilation or essential services.
9. Complete inspection, testing and handover
Before the floor is brought into normal use, the completed installation should be inspected against the approved design and specification. Checks commonly cover structural connections, floor condition, guarding, stairs, gates, barriers, clearances, signage and any fire or electrical provisions included in the project.
Relevant approvals, certificates, drawings, structural calculations, operating information and maintenance instructions should be assembled into a handover pack. The final documentation should record any agreed limitations, such as maximum loads, permitted equipment, access restrictions or requirements for future alterations.
Staff should be briefed on safe use, including load limits, keeping edges and escape routes clear, reporting damage and preventing unapproved changes. The building’s risk assessments and emergency arrangements should be updated before the area is occupied.
10. Plan ongoing inspection and maintenance
Installation is not the end of the process. The floor should be included in the site’s inspection and maintenance arrangements, with checks carried out at a frequency appropriate to its use and environment. Inspections should look for impact damage, loose or damaged components, changes to loading, corrosion, worn floor panels, altered access arrangements and compromised guarding.
Repairs or modifications should be assessed by a competent person before work is undertaken. Keeping the original drawings and handover information available makes future inspections, alterations and compliance reviews more reliable.
In practice, the most effective projects involve the designer, installer, building control contact and site team from the beginning. Early confirmation of loads, access, fire requirements and site restrictions helps prevent redesign, approval delays and unsafe changes during installation.
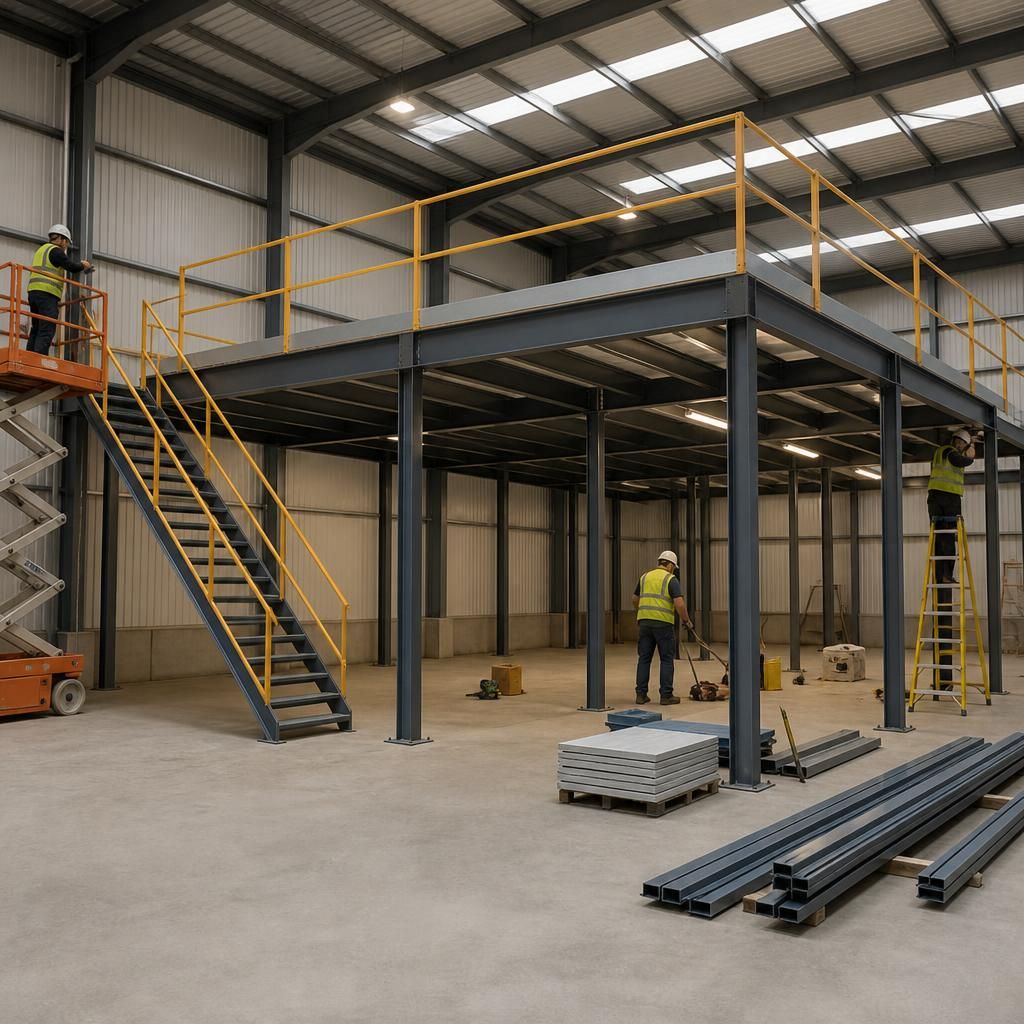
A detailed site survey is a critical early step in planning and installing a mezzanine floor because it confirms whether the proposed structure can be accommodated safely. The survey should record building dimensions, available headroom, slab condition, existing columns, services, access routes, fire exits and any obstructions that could affect the design or installation sequence.
Measurements should be checked against current site conditions rather than relying solely on original drawings. The survey findings help the structural designer position supports, confirm loading requirements and plan stairs, guarding, gates and escape routes. Identifying restrictions before manufacture can prevent redesign, approval delays and unexpected installation work.
Plan Your Mezzanine Floor Installation
Speak to our team about your proposed mezzanine floor installation to review the site requirements, loading needs, approvals and installation arrangements.