
What essential tools and equipment are needed for warehouse racking installation?
Essential tools for warehouse racking installation include calibrated torque wrenches, drills, impact drivers, spanners, levels, tape measures, plumb lines and appropriate access or lifting equipment. Installers also need the correct anchors and fixings, personal protective equipment, exclusion barriers and inspection documents to assemble, align and secure the system safely in line with the manufacturer’s instructions and site requirements.
The essential tools and equipment for warehouse racking installation are those needed to measure the layout, assemble the components, align the structure, secure it to the floor and verify that it has been installed correctly. A typical installation requires calibrated torque tools, drills, impact drivers, spanners, levels, tape measures, plumb lines, suitable access or lifting equipment, approved anchors and fixings, personal protective equipment and site-control materials. The precise selection depends on the system design, manufacturer’s instructions, floor construction, installation environment and the components being fitted.
Tools should be checked before work begins and used only by operatives who understand their correct application. Substituting tools, fixings or access equipment without approval can affect structural performance and may invalidate the manufacturer’s installation requirements.
Measuring and setting-out equipment
- Tape measures and laser measures: used to confirm bay dimensions, aisle widths, clearances, column positions and the available installation area.
- Chalk lines and marking tools: used to transfer the approved layout accurately to the floor.
- Spirit levels and laser levels: used to check that frames, beams and other components are level and correctly positioned.
- Plumb lines or laser plumbs: used to identify out-of-plumb frames and confirm vertical alignment.
- Squares and straight edges: useful for checking right angles, component alignment and local distortion.
- Site drawings and layout plans: these provide the reference points for bay locations, aisle arrangements, protection equipment and any specified clearances.
Setting out should take account of building columns, doors, fire routes, lighting, sprinklers, plant movement and floor obstructions. Measurements should be checked against the approved design before components are assembled, rather than relying on adjustments during installation.
Assembly and fastening tools
- Spanners and socket sets: used for bolts, nuts and other specified connections.
- Torque wrenches: used to tighten connections to the manufacturer’s stated torque. They should be suitable for the required range and within their calibration period.
- Adjustable and combination spanners: useful for holding and positioning components, although they should not replace a torque wrench where a defined tightening torque is required.
- Drills and impact drivers: used for suitable fixing and assembly tasks, with the correct bits, sockets and settings.
- Masonry drills and dust-removal equipment: required where floor anchors are installed into concrete, subject to the anchor manufacturer’s instructions.
- Rubber mallets and soft-faced hammers: may assist with positioning components without damaging protective finishes. Heavy or uncontrolled impacts should be avoided.
- Screwdrivers, hex keys and bit sets: used for secondary fittings, guards, signage and proprietary connections.
Impact tools can speed up repetitive work, but they must not be used in a way that damages threads, over-tightens fixings or conceals a poor connection. Final tightening and verification should be completed with the specified hand tool or calibrated torque wrench where required.
Anchors, fixings and connection materials
Anchors and fixings must be selected for the actual floor type, load requirements and installation detail. Common items can include concrete anchors, bolts, washers, nuts, shims, packers, locking devices and replacement connection hardware. The correct diameter, embedment depth, edge distance and installation method are determined by the design and fixing manufacturer; they should not be guessed on site.
Before drilling, installers should confirm the floor condition and check for services or embedded obstructions where relevant. Dust, loose material and damaged concrete can affect anchor performance. Any unsuitable floor area, missing fixing or damaged component should be reported and resolved before the installation proceeds.
Access and lifting equipment
- Podiums, steps or mobile access towers: used where components must be positioned at height, provided the equipment is suitable for the task and used on a stable surface.
- Forklift trucks or other lifting equipment: used to move frames, beams and accessories when their capacity, attachments and operating conditions are appropriate.
- Mechanical lifting aids: may reduce manual handling risks when components are long, heavy or difficult to control.
- Material trolleys and stillages: used to move components safely around the installation area and keep walkways clear.
- Tag lines or controlled-handling aids: can help guide suspended or awkward components where a planned lifting method permits their use.
All lifting and access equipment must be inspected, operated by competent people and used in accordance with its instructions. Installers should never climb on partially assembled frames, pallets, beams or makeshift platforms. The work area should be planned so that materials are stable, lifting routes are clear and people are kept away from suspended or falling loads.
Personal protective equipment and site controls
- Safety footwear with suitable toe protection and sole protection.
- Safety helmets, particularly where there is a risk of falling objects or overhead work.
- High-visibility clothing where vehicles or mobile plant operate nearby.
- Cut-resistant gloves selected for the material-handling task.
- Eye protection when drilling, cutting, using impact tools or working where debris may be produced.
- Hearing protection where noise levels from drilling, lifting or other activities require it.
- Respiratory protection where dust cannot be adequately controlled by other methods.
- Harnesses or other fall-protection equipment only where the risk assessment identifies a need and the equipment can be used correctly.
Personal protective equipment is only one part of the control system. Barriers, cones, warning signs and a clearly defined exclusion zone are needed to separate installation work from warehouse traffic and unauthorised access. Good housekeeping is equally important: packaging, offcuts, unused fixings and drilling dust should be removed regularly to prevent trips and keep emergency routes available.
Inspection and verification equipment
Installation teams need more than hand tools to confirm that the completed warehouse racking is safe. Useful inspection equipment includes a calibrated torque wrench, level and plumb checks, a tape measure, a torch, a camera or approved digital inspection device, and documentation for recording results. Where appropriate, installers may also use equipment to check floor levels, anchor installation or component dimensions.
Checks should cover the position and alignment of frames, the engagement of beams and safety locks, the condition of bracing, the installation of anchors, the specified clearances, protection equipment and any visible damage. The completed installation should be compared with the design and manufacturer’s instructions. Any deviation should be recorded and referred to a competent person rather than corrected by an improvised alteration.
Documents and information required on site
- The approved layout and installation drawings.
- The manufacturer’s assembly and fixing instructions.
- Load notices and component specifications.
- Risk assessments and method statements.
- Inspection records for tools, lifting equipment and access equipment.
- Calibration records for torque wrenches and other measuring equipment where applicable.
- Delivery records and component checks to identify missing, incorrect or damaged parts.
- Handover and installation-completion records.
These documents help the installation team work consistently and provide an auditable record of what was installed and how it was checked. They also support later inspections, maintenance and any required changes to the warehouse layout or loading arrangements.
How the equipment is used during installation
- Review the drawings, instructions, risk controls and site conditions before unloading or assembling components.
- Measure and mark the approved positions, checking clearances and obstructions.
- Move components into the work area using suitable handling methods and keep the installation zone controlled.
- Assemble frames, bracing and beams with the specified tools, checking each connection as work progresses.
- Use levels, plumb checks and measurements to align the structure before permanent fixing.
- Drill and install approved anchors in accordance with the fixing instructions, then verify the connections.
- Fit protection, safety locks, signage and accessories shown in the design.
- Complete a final inspection, record any outstanding items and prevent use until safety-critical defects have been resolved.
The most important tool is competent judgement. A well-equipped team still needs to recognise damaged components, unsuitable floors, incorrect fixings, alignment problems and unsafe access conditions. If the specified equipment is unavailable or a site condition differs from the design, work should pause until the issue has been assessed by an appropriately competent person. This approach helps ensure that warehouse racking is assembled accurately, secured properly and ready for safe operational use.
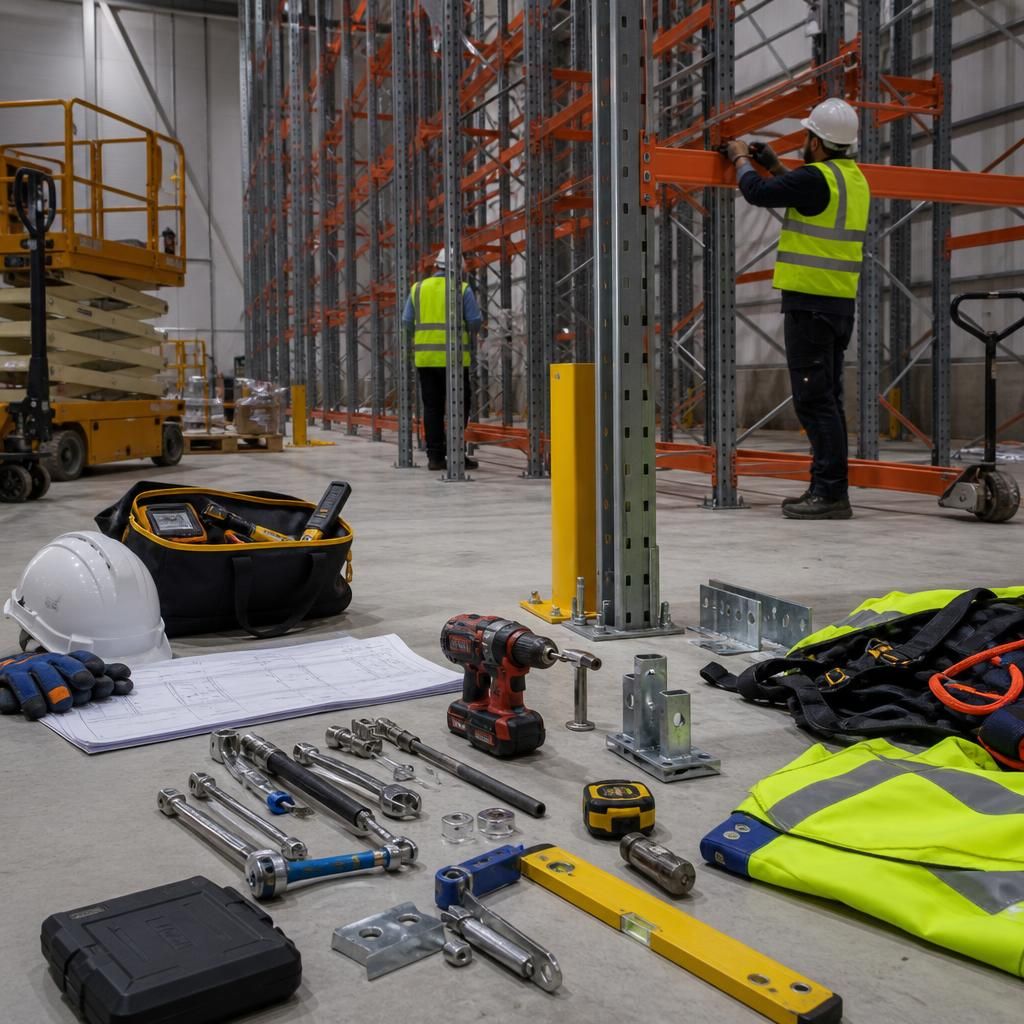
A calibrated torque wrench is essential for securing warehouse racking connections to the manufacturer’s specified tightening level. Under-tightened fixings may loosen, while excessive force can damage threads or components, so installers should use the correct tool and verify that its calibration remains current.
Torque checks should form part of the installation record, alongside alignment, anchor, beam-lock and component checks. If the correct wrench, fixing or calibration information is unavailable, work should pause until the issue has been resolved by a competent person.
Book Your Warehouse Racking Installation Training
Book your warehouse racking installation training with Able Racking to develop practical skills in safe assembly, alignment, fixing and inspection. Contact our experienced training team to discuss your site requirements and arrange a suitable session.